Summary of the creation flow
- Information → Create the product with its basic data
- Texts → Describe the product for customers (in every language)
- Images → Add the main photo
- Time slots → Set time slots if applicable
- Prices → Set up rates and their types
- VAT → Apply the appropriate tax rates
- Address → Specify a location if different from the supplier’s
- Options → Enable sellable extras
- (Bonus) Advanced Settings → Fine-tune the product’s behavior
- (Bonus) Closures → Manage unavailability on the calendar
Accessing product creation
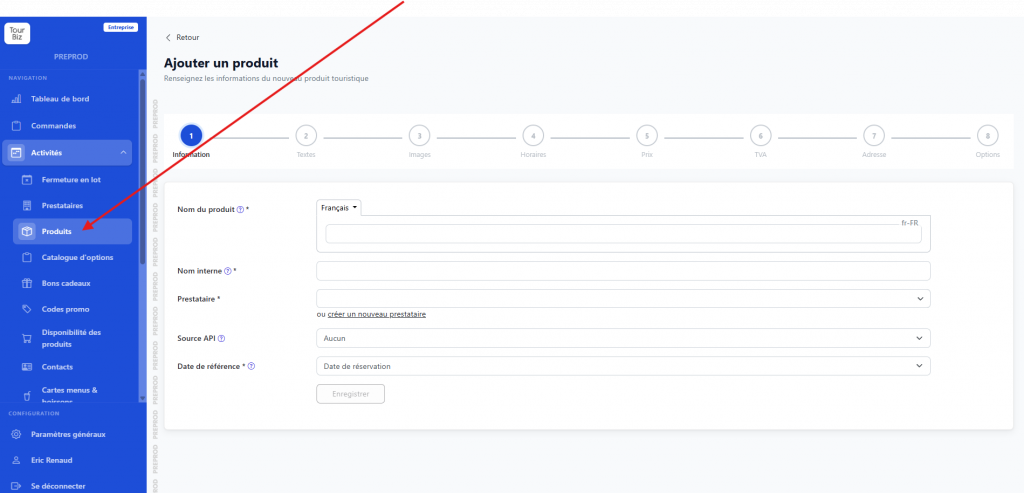
To create a new product, go to the left navigation menu under Activity > Products, then click the + Add button at the top right of the list. This takes you into the 8-step creation wizard.
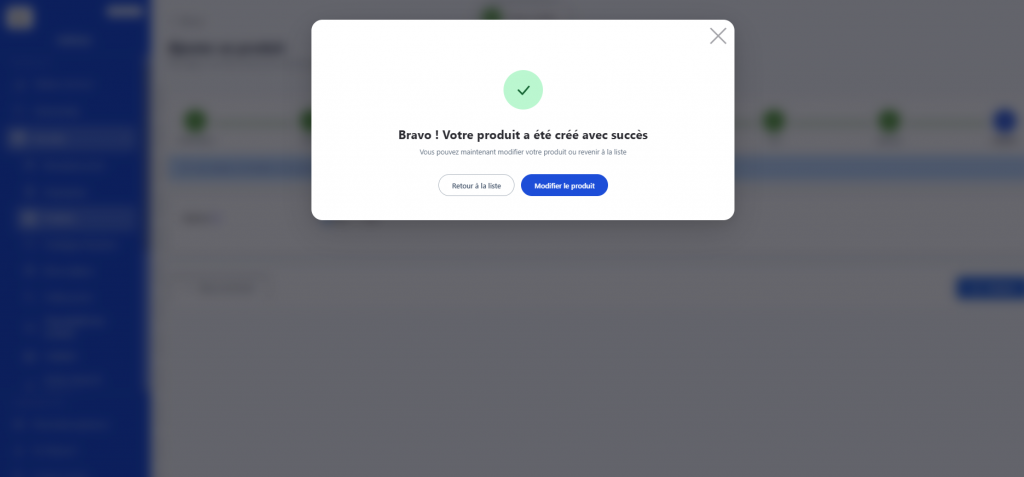
Good to know: The initial creation (step 1) is deliberately minimal — it saves the basic information and then unlocks all the advanced configuration tabs.
Step 1 – Information (the product basics)
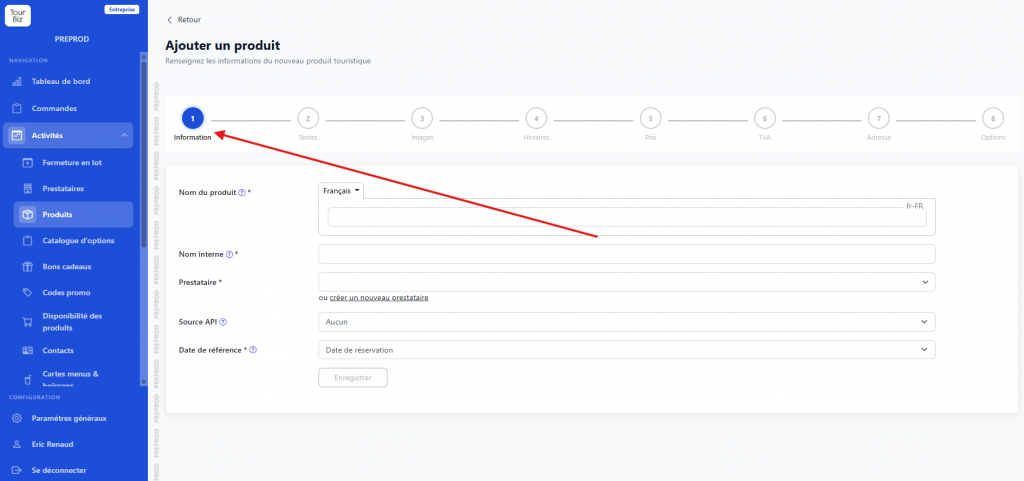
This is the first thing to fill in before accessing the rest. This step has 4 fields:
Product name (required) — This is the name shown to your customers on the site. It’s multilingual: you can enter translations in French, English, German, Spanish, Italian, Portuguese, etc. The language selector at the top of the field lets you switch between versions.
Internal name (required) — This name is only visible to your team in the back office. It’s used to easily tell products apart in your lists, especially if you have several variations of the same product. Tip: adopt a consistent naming convention (e.g.: “A1 – Adult only · No time slot”).
Supplier (required) — Attach the product to one of your existing suppliers. If the supplier doesn’t exist yet, a “create a new supplier” link is available directly from this field.
API source — If you’re using a connection with a third-party system (e.g.: Rezdy), select it here. Otherwise, leave it as “None.”
Reference date (required) — This field determines how the product is dated in the system. Three options:
- Booking date: the date the customer places their order (for gift vouchers or products with no specific date).
- Pickup date: the date the customer collects their ticket or voucher.
- Validity limit: a deadline beyond which the product expires.
Step 2 – Texts
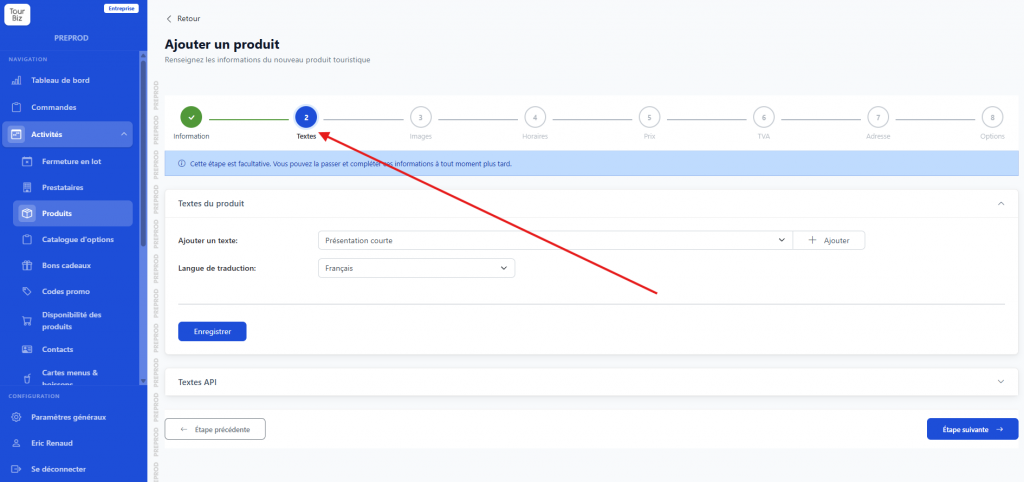
Once the product is created, the Texts tab lets you enrich the product sheet with written content.
Product texts — Click the section to expand it, then use the “Add a text” dropdown to choose the type of text to write. The available types are:
- Short overview: a quick hook for product listings.
- Highlights: the key selling points to promote.
- Booking process: an explanation of the flow for the customer.
- What to know (Voucher): information printed on the voucher.
- Practical information: how to get there, parking, etc.
- Ticket text: content shown on the e-ticket.
- Promotion description: text specific to promotional offers.
- Rate conditions: cancellation rules, modification rules, etc.
- Url: an external link associated with the product.
Multilingual detail: The “Translation language” selector lets you enter each text in every configured language. Remember to save language by language.
API texts — If the product is connected to an external API, this section shows the texts automatically pulled from the third-party system.
Step 3 – Images
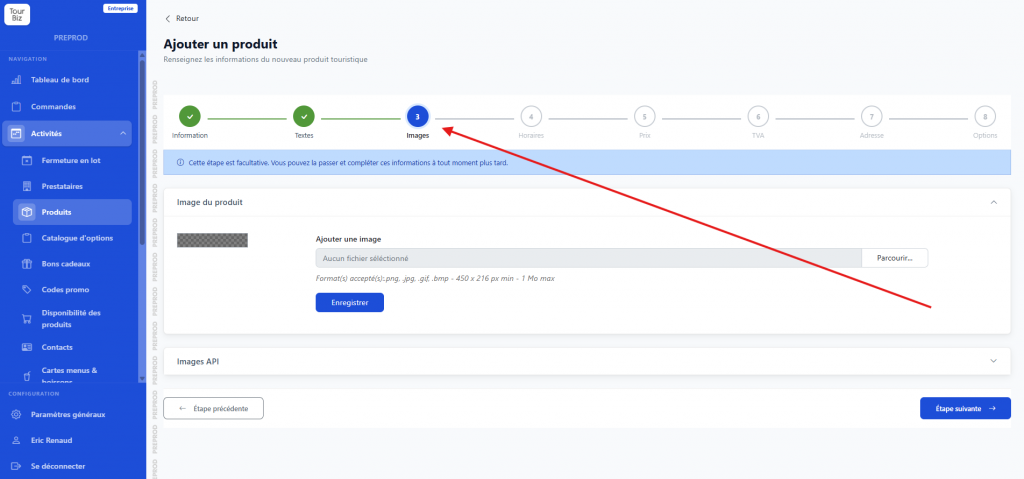
Product image — Upload the product’s main photo. Technical requirements to follow: accepted formats png, jpg, gif, bmp — minimum size 450 x 216 px — maximum weight 1 MB.
Tip: Use a high-quality, horizontal image to ensure it looks good on every page of the site (listing, detail page, e-ticket).
API images — As with texts, this section shows images automatically pulled from an API connector, if applicable.
Step 4 – Time slots
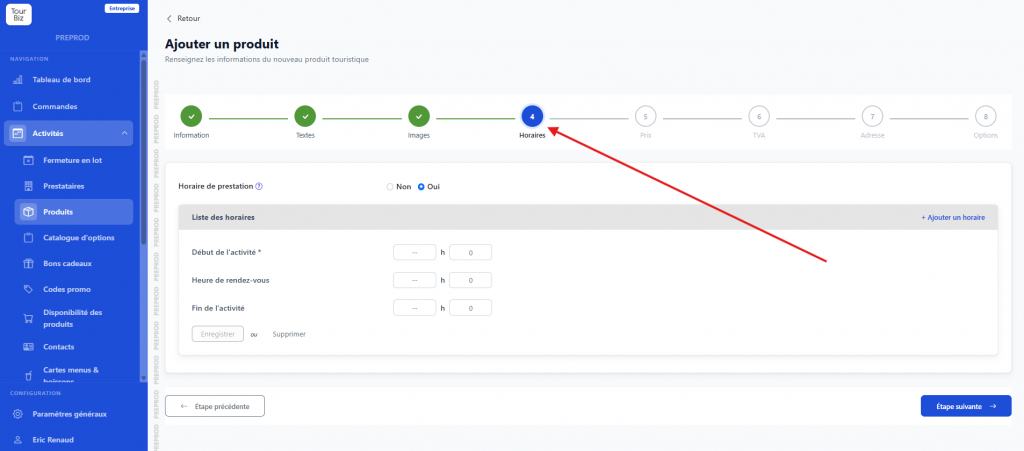
This is where you decide whether your product works with fixed time slots.
Service time slot — This “No / Yes” radio button is the central switch. It defaults to “No,” meaning the product is available for the day, with no specific time.
If you switch it to “Yes”, several blocks open up:
Time slot list — Add as many slots as needed via the “+ Add a time slot” button. For each slot, fill in:
- Activity start (required): the start time.
- Meeting time: the time the customer needs to show up (often before the start).
- Activity end: the end time.
Detail: The “Manage informational times” link (available per slot) lets you attach a specific information text to a slot (useful for indicating a different meeting point depending on the time, for example).
Period list — This crucial section defines when and how the time slots apply on the calendar. For each period:
- Give it a name (Regular or Special).
- Set the validity date range.
- Choose the display mode (Week or Day).
- Check the relevant days of the week.
- Attach the time slots available on those days.
Step 5 – Prices
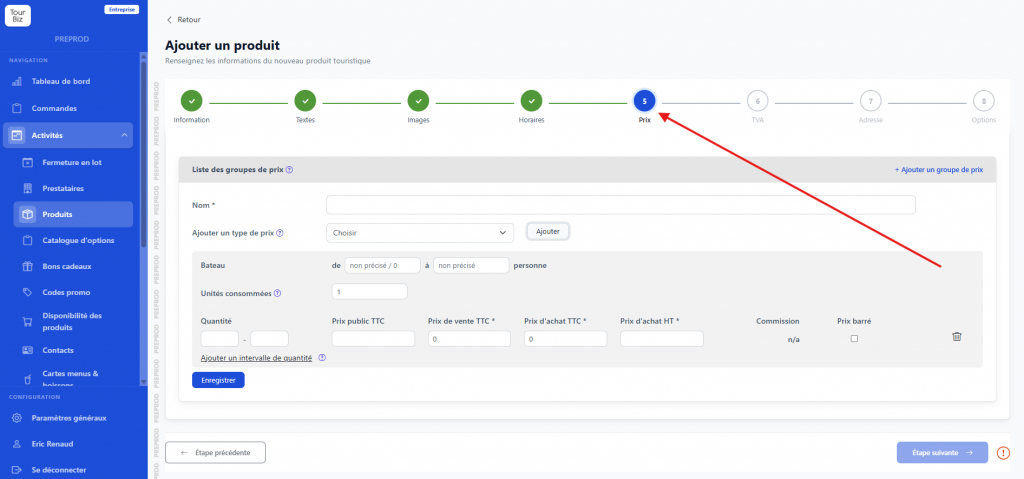
This is one of the richest steps. It’s organized into two main blocks.
Price group list — A price group corresponds to a combination of rate types. You can create several groups (e.g.: a “2026” group, a “High season 2026” group) and archive or hide them as needed.
For each group, define:
- A Name (e.g.: “Adult only,” “Adult + Child · No time slot”).
- One or more rate Types, chosen from: Adult, Child, Baby, Student, Senior, Youth, Full Rate, Single Rate, Group Package, Free, Disabled Person, Boat.
For each type, you configure:
- Age range (from / to, in years): useful for child/adult rates with specific thresholds.
- Units consumed: how many stock units this rate consumes (usually 1, but can be 0 for a free ticket).
- The price grid with, for each quantity row:
- Public price incl. tax: the price shown on the site.
- Selling price incl. tax: the price charged to the customer (can differ in case of promotions).
- Purchase price incl./excl. tax: the internal cost for your business.
- Commission: calculated automatically.
- Crossed-out price: enable the checkbox to show the old, struck-through price (promotional offer).
Detail about quantity ranges: The “Add a quantity range” link lets you create tiered rates based on the number of participants (e.g.: a different rate for 1 to 10 people, then for 11 to 20).
Price period list — You can define several pricing periods (high season, low season, Christmas…) with their own validity dates. If your product has time slots, the “Prices vary by time slot” option lets you apply a different rate depending on the chosen slot.
Step 6 – VAT

VAT application — Two modes:
- Global: a single VAT rate applies to the whole product (the most common case).
- Split: different VAT rates depending on the product’s components.
VAT on purchase prices (required) — Choose the rate that applies to your purchase prices among the available rates: 20%, 10%, 10% Transport, 5.5%, 2.10%, 0%.
VAT on selling prices — By default, the same VAT applies to selling prices. However, you can set a different rate if your tax situation requires it.
Validity dates — You can define VAT rules with date ranges, and add several of them to handle rate changes over time.
Accounting code, price excl. tax (class 7) — Attach an accounting code per VAT rate to make your accounting export easier.
Step 7 – Address

By default, the product uses the address of the supplier it’s attached to. By switching this field to “Yes”, you can enter an address specific to the product (a meeting point different from the supplier’s head office, for example).
Typical use case: A supplier based in Paris offering a tour of Versailles — the product’s address will be that of the Château de Versailles, while the supplier’s administrative address stays in Paris.
Step 8 – Options
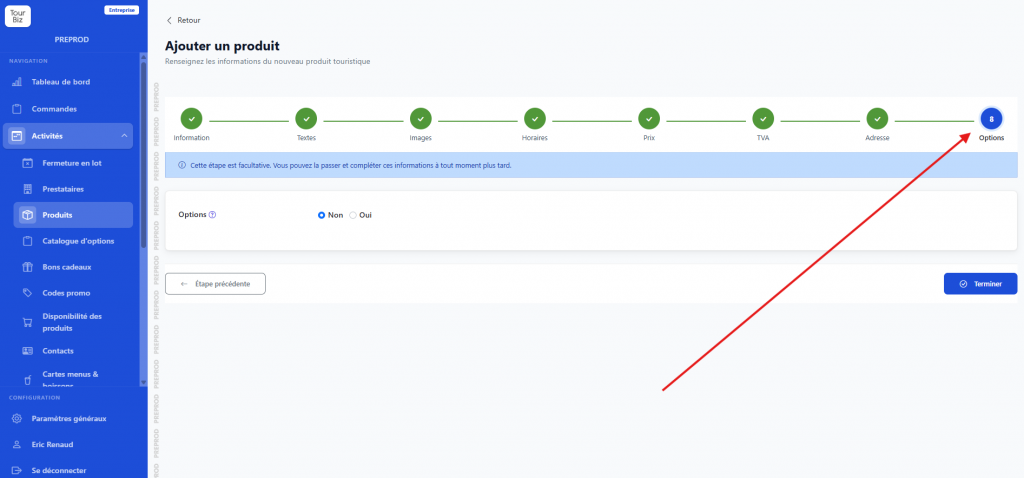
By switching to “Yes”, you allow sellable options to be attached to this product (extras, additional services). These options are managed in the separate options catalog (Activity > Options catalog).
Note: Enabling options only allows them to be attached to the product. You’ll then need to go to the Options catalog to create the options themselves, then link them to this product.
Bonus tab – Advanced Settings
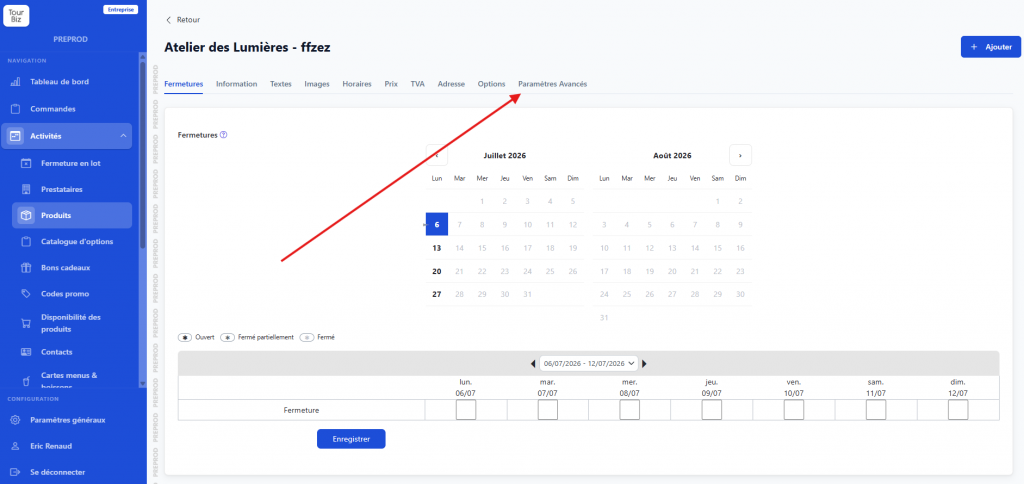
This tab is only accessible after the product’s first creation. It groups expert-level settings, organized into several collapsible subsections.
Product — The essential behavioral settings:
- Time zone: important for products offered outside France.
- Supplier product reference: your internal reference or the third-party supplier’s.
- Handling / modification fee: additional amounts that apply.
- Max. number of pax per cart: limits the number of participants per order.
- Type: Normal, Seat map (for activities with assigned seats), or PUDO (pick-up/drop-off, for transport).
- Gift voucher: enables compatibility with gift vouchers.
- Exclusivity: the product is reserved for an exclusive sales channel.
- Archived: hides the product without deleting it.
- Booking mode: “Normal” (instant confirmation) or “On request” (request subject to manual approval).
- Delivery method: 1 voucher for the whole booking, or 1 ticket per person.
- Retrieval: how the customer receives their ticket: Mobile, Print, Pick-up.
- Supplier confirmation mode: how the confirmation number is generated (internal, external, retrieved from the supplier, etc.).
- Confirmation type: Instant, within 24h, within 48h.
- Country blocklist: prevent customers from certain countries from booking this product.
Accounting — Analytic codes for your accounting.
Cutoff — The deadline before the service date beyond which bookings are no longer accepted.
Calendar validity — Set the date range during which this product is available for sale.
Form — Add custom questions for the customer to fill in when booking (allergies, skill level, participant names…).
Barcode — Configure the format of the barcode or QR code shown on tickets.
Cancellation terms — Set a cancellation policy specific to this product (different from or complementary to the global policy).
POI — Geographic points of interest associated with the product (shown on maps).
Categories — Classify the product into categories to make navigation on your site easier.
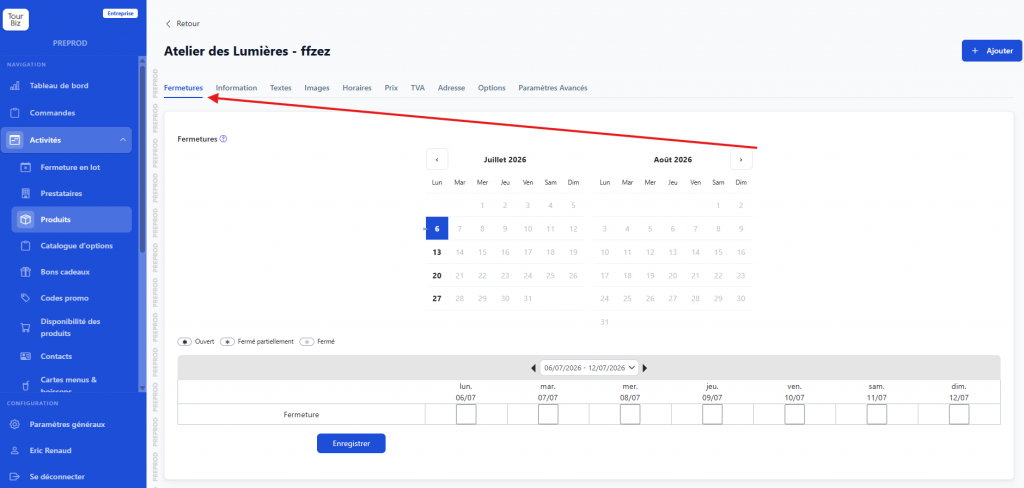
The Closures tab
Available from the product’s tab menu once created, this tab shows a two-month calendar for managing the product’s unavailability.
Each day can be marked as:
- Open (default)
- Partially closed (only some time slots)
- Closed (no availability)
The weekly table view lets you quickly check off closures across several consecutive days. For recurring or bulk closures, use the Bulk closure feature available in the main navigation menu.