For Room-type resources, in the Seating plan tab, product advanced settings
For an overview of a room’s record (general information, cash register, resource assignment), see Rooms in Tourbiz.
What is the seating plan for?
The seating plan in Tourbiz is a pre-service management tool: it lets you organise and assign seats in a space before the event takes place — not at the time of online booking.
It is designed for operators who need to manage their space physically: assigning tables to groups, optimising how a room is filled, placing customers on a precise plan.
Typical use cases: cabarets & shows, dinner cruises, sightseeing buses, lunch cruises.
Important — difference with seating at booking time The Tourbiz seating plan does not handle customer seating at the moment they book online. It is an operations tool: the organiser assigns seats manually from the back office, ahead of the service.
1. Create a Room-type resource
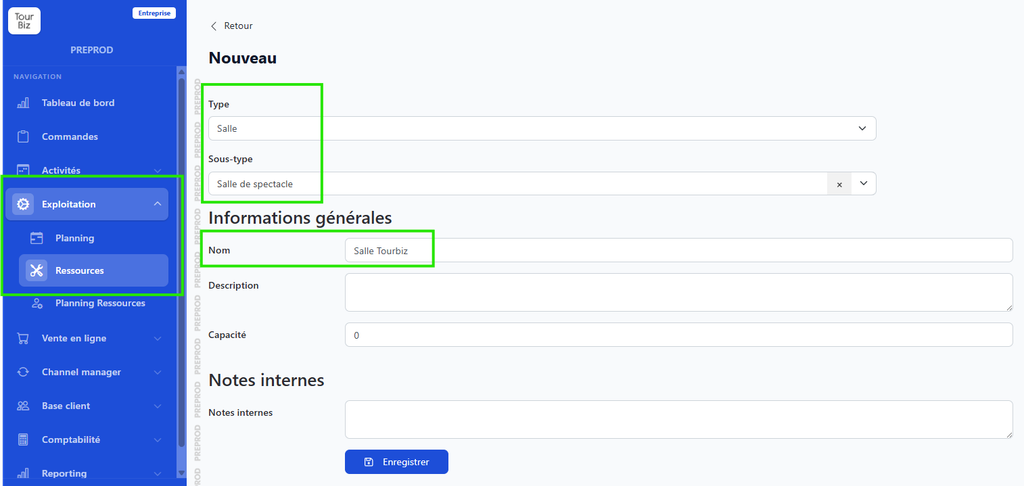
The seating plan is attached to a Room-type resource. Before you can access the Seating plan tab, you therefore need such a resource — or to create one.
Path: Administration → Operations → Resources → New
When creating it, fill in:
Type: select
- Room
- Sub-type: choose the sub-type that matches your space (examples:
- Deck: for the deck of a boat,
- Workshop: for a workshop,
- Theatre: for a performance hall…)
- Name: give this resource a clear name
- Capacity: total number of places (indicative, the seating plan will refine this figure)
Save the resource. The Seating plan tab then becomes available in the editing interface, next to the General information tab.
The Seating plan tab only appears on Room-type resources. If you start from an existing resource of another type, you will need to create a new resource.
2. Generate the first floor of the plan
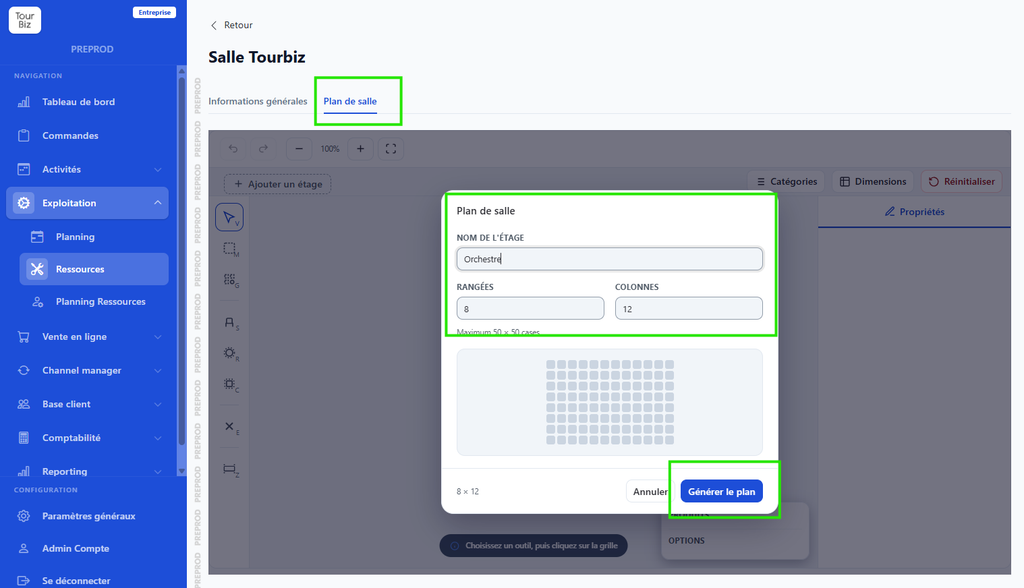
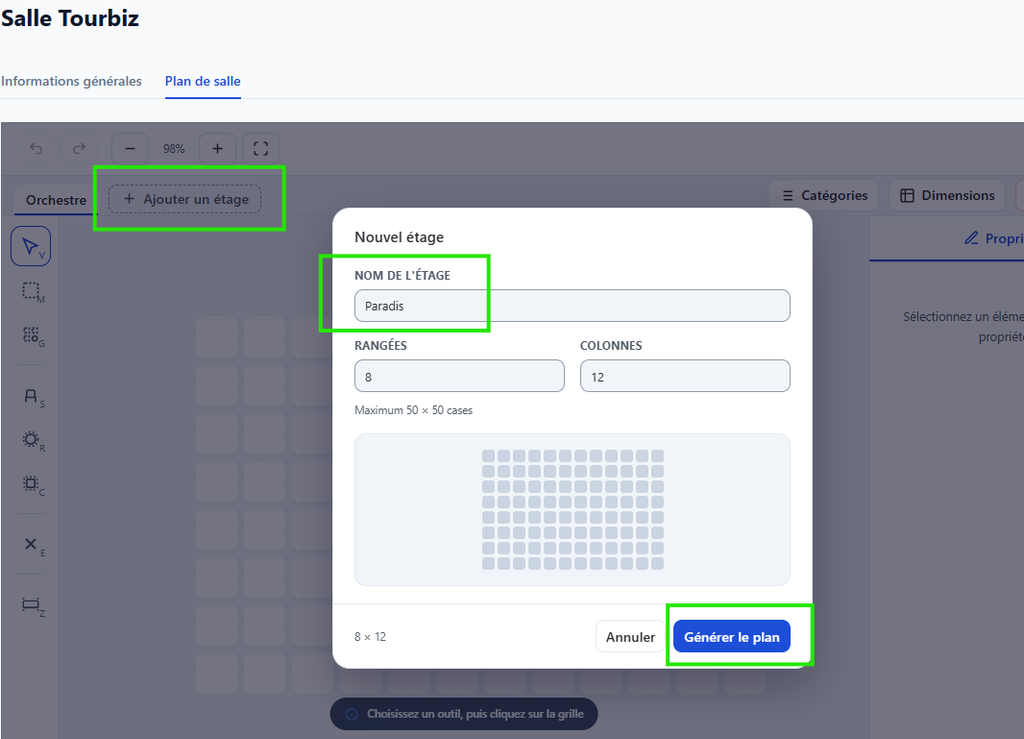
When you click the Seating plan tab for the first time, a window opens to set up the first level:
| Field | Description |
|---|---|
| Floor name | Name of the level (e.g. “Ground floor”, “Stalls”, “Main deck”, “Level 1”) |
| Rows | Number of rows in the grid (maximum 50) |
| Columns | Number of columns in the grid (maximum 50) |
The generated grid (rows × columns) is the basic framework of the plan. Each cell can then hold a table, a seat, or stay empty (space, aisle, stage…). Click Generate the plan to confirm.
Size the grid according to the density of your space. An 8 × 12 grid will suit a small room; a large performance hall or a boat will need a wider grid. You can add extra levels afterwards.
3. Manage levels (floors)
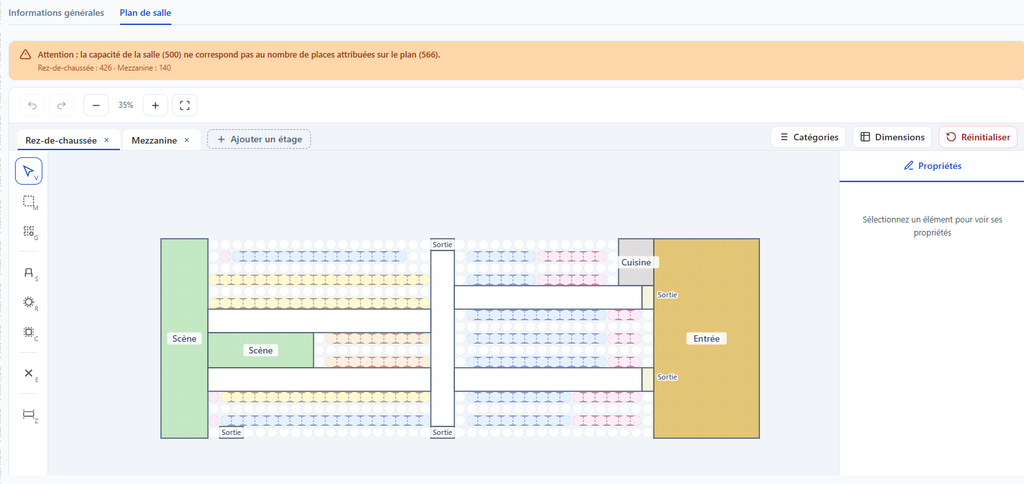
A plan can have several levels to represent stacked spaces: decks of a boat, a cabaret mezzanine, a theatre balcony, levels 1 and 2 of an open-top bus…
From the editor, the + Add a floor button creates a new level with its own grid and name. Each level is independent. The resource’s total capacity takes all configured levels into account.
4. Build the plan: tables, seats and empty spaces
The grid is made of cells. Each cell can be:
| Type | Use |
|---|---|
| Square table | Rectangular table with seats — banquet, restaurant |
| Round table | Circular table with seats — cabaret, dinner cruise |
| Individual seat | Single place — theatre, bus, boat with numbered seats |
| Zone / label | Visual information (stage, bar, exit, aisle) — cannot be assigned |
| Empty cell | Free space on the plan (corridor, circulation area) |
By arranging the cells, you faithfully reproduce the real layout of the space: rows of seats separated by empty aisles, clusters of tables, a stage marked out by zones, etc.
Group bookings on adjacent cells — adjacent tables or seats on the grid can accommodate group orders. Examples:
4 people booking together at the theatre will be grouped on 4 adjacent seats
A booking for 12 people can be split across 2 adjacent tables of 6
5. Create categories
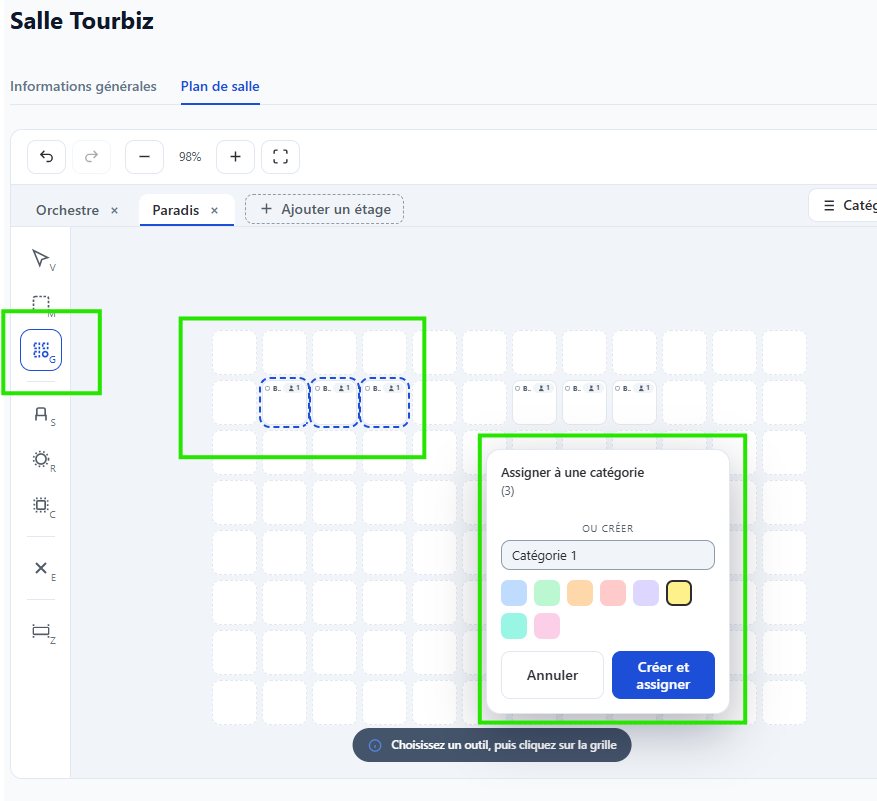
Categories let you group tables or seats by type or location (VIP, terrace, stage view, aft deck…). They make assigning seats and reading the plan easier.
The Categories button at the top right of the editor lets you create and manage them. A category can then be used in multiple selection to bulk-edit the properties of the items it contains.
Create your categories before placing items on the plan so that you can assign them directly when creating each table or seat.
6. Multiple selection & bulk editing
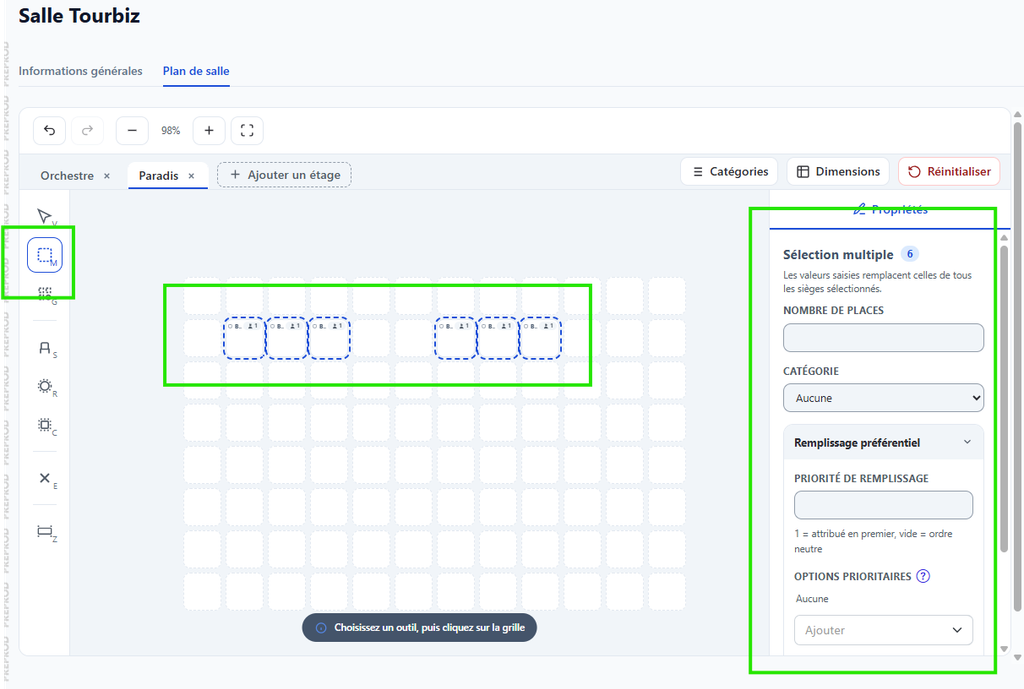
Multiple selection lets you edit several tables or seats at the same time. Select several items on the plan to access grouped actions.
Properties that can be bulk-edited:
Number of places — capacity of each selected table or seat
Category — assignment to a category (VIP, Standard, etc.)
Preferred filling — order in which these places will be offered during automatic pre-filling
7. Options, priority products & pre-filling
For each table or seat individually, you can set properties that allow the system to suggest smart automatic pre-filling when running an event.
| Property | Description |
|---|---|
| Associated options | Options specific to this table (e.g. panoramic view, wheelchair access). The system will favour this table for bookings with these options. |
| Priority products | Tourbiz product(s) to assign to this table first. E.g. a VIP table reserved for “Prestige Menu” tickets. |
| Filling priority | Order in which this table will be filled during automatic pre-filling. A low value = filled first. |
Automatic pre-filling — once preferences are set up, Tourbiz can automatically suggest an optimised allocation for a given event, taking into account the products booked, the options and the filling priority. The operator always keeps control and can adjust manually.
8. Colours & codes on the plan
For options or products to be visually identifiable on the seating plan and in exports, you need to set their colour and code directly in the record of the Tourbiz product concerned — not in the seating plan itself.
Path: Catalogue → [Product] → Advanced settings
| Field | Description |
|---|---|
| Colour (seating plan) | Colour shown on the plan to visually identify the tables/seats linked to this product. |
| Code (seating plan) | Short code (e.g. “VIP”, “A4”, “DIN”) that appears in the plan legends and in exports. |
The colours and codes set here also appear in seating plan exports. See the dedicated exports tutorial to learn how to use them.
9. Manage several layouts of the same space
Important point: in Tourbiz, you cannot create several seating plans within the same Room resource. Each space layout must be created as a separate Room resource.
For example, to manage a boat that can host a dinner cruise in a “round tables” layout and a standing cocktail party, you will create two separate Room resources:
“Boat — Dinner layout” (round tables, 150 covers)
“Boat — Cocktail layout” (standing areas, 300 people)
Each Room resource has its own seating plan, which is the reference layout for that arrangement. When creating an event, you choose the resource — and therefore the layout — that matches the planned evening.
Give your Room resources clear names so that choosing the right layout is immediate when creating an event.
10. Link with planning events
When creating an event in the planning, you choose the Room resource to associate, which determines the base layout of the plan.
The plan is copied on assignment — when you assign a Room resource to an event, Tourbiz creates an independent copy of the plan for that event. You can then edit this copy as you wish — remove a table, adjust places, move items — without affecting the resource’s reference layout. This lets you fine-tune each event while keeping the original model intact.
Steps:
Create the event in the planning — from the planning, create a new event for the date concerned.
Choose the Room resource — select the base layout that matches this event. A copy of the plan is created automatically.
Adapt the plan if needed — edit the event’s copy as you wish. These changes do not affect the reference layout.
Assign places & run the event — assign bookings to tables and seats from the operations interface. Use automatic pre-filling if preferences have been set up.
See also: Planning & events tutorial · Managing seating on the plan before an event